5 Relationships and Relationship Tools
Ron McFadyen
In this chapter, we will sharing information about database relationships and how relationships are defined from one table to another. The Relationships Tool is used to define relationships between tables based on common fields. Relationships defined using the Relationships Tool are important as they help ensure integrity of data and they provide us with default join criteria for queries involving more than one table.
In this section, we will use the University and the Library databases in our examples.
Consider the University database that contains a Department table and a Course table. These two tables have the deptCode field in common:
In the Department table, deptCode is the primary key and is used to identify a specific department.
In the Course table, the deptCode field is a part of the primary key and indicates the department to which the course belongs.
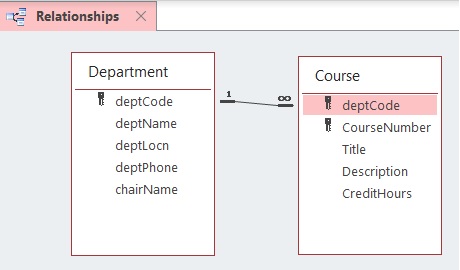
To ensure that a row in Course is related to an existing row in Department, we can use the Microsoft Access -Relationships Tool to define a relationship between these two tables based on this common field. Using a diagram, we can illustrate this connection between these two tables:

Figure 5.1 Displaying a relationship between two tables
In this situation, we say that deptCode in Course is a foreign key referencing the deptCode field in Department.
Now, consider the Library database:
The Loan table has a callNo field as well as the Book table; the callNo field identifies a specific book.
The Loan table has an id field as well as the Member table; the id field identifies an individual member.
In the Library database, we can establish a relationship between the Loan table and the Book table based on the callNo field. A second relationship can be established between the Loan table and the Member table based on the id field. Using a diagram, we can illustrate these two relationships:

Figure 5.2 Showing relationships involving three tables
The Loan table has two foreign keys identified as callNo and id:
The callNo field in Loan references the primary key (callNo) in Book.
The id field in Loan references the primary key (id) in Member.
5.1 Database Integrity In Relational Database Design
Primary Key
Recall that a table’s primary key (PK) is a field (possibly composite) that has unique values. Each record row has a PK value different from any other row in the table. Primary key is a field with a unique identifier. If a query were designed to retrieve a row of that table based on a value of the PK, then at most one row of the table will be retrieved.
Foreign Key
A foreign key is a field (or combination of fields) in a table B that is associated with a primary key field in a table A through a relationship (A and B can be the same table). Data redundancy is eliminated by having a foreign key in one table related to a primary key in another table.
Entity Integrity
When we define a primary key for a table, we are enforcing entity integrity. Entity integrity means that each row in the table is identifiable through its primary key. Microsoft Access requires a value for a primary key in a newly added row, and Access enforces uniqueness of those values.
Referential Integrity
Suppose we have two tables, table A and table B, where a relationship is defined between the primary key of table A and a foreign key in table B. We say referential integrity exists for this relationship if each row in table B has either:
- a foreign key (FK) that does not have a value at all (i.e. it is null) or
- a foreign key (FK) that has a value that exists as a primary key (PK) value in a record row in table A.
5.2 Relationships
Tables can be related through one-to-one, one-to-many, or many-to-many relationships. If you open the Access Relationships Tool for the University database, you will see the following diagram showing two tables and a one-to-many relationship:

Figure 5.3 Access One-to-Many Relationship with Department and Course Tables
There are two symbols on the relationship line which inform us the table relationship is one-to-many for which there are two rules that are in place:
-
-
- For each department there will be zero or more courses for that department, and,
- Each course is for exactly one department.
-
To create a relationship in Microsoft Access, you must
- Open the Relationships Tool located in the Database Tools tab.
- Add the pertinent tables to the diagram if they are not there already
- Click, hold, and drag a field (normally this is the PK) of one table to the related field (to become a FK) in the other table.
You will be asked whether or not Referential Integrity is to be enforced. As a general rule-of- thumb, you should select Yes. There must be some exceptional circumstance that makes you select No.
Once relationships are established using the Relationships tool, they are used by Microsoft Access when you create queries. These relationships are then used as your default table joins.
5.2.1 One-To-Many Relationship
In relational databases, one-to-many relationships is one of the most common type of relationship between two tables. As described in the previous example, there is one record (also known as parent record) in a table which must be associated with one or more records (child or children records) in a second table to establish a one-to-many relationship. You will need to verify that both the PK field and FK field have the same data type to create this relationship even though these fields have different names.
In Access, you can create relationships by selecting the Relationships command and displaying your tables. You drag the primary key (PK) field of one table to the other table. The primary key field in the first table must contain unique values. If the foreign key (located in the second table) does not have unique values, then you are creating a one-to-many relationship. The relationship between the two tables will be illustrated by then having Access display a relationship line.
To summarize one-to-many relationships: For each row in the referenced table, there can be several related rows in the other table. For a primary key (PK) value, there can be many rows in the other table with that value stored as the foreign key (FK). Let’s look at the following example to illustrate a one-to-many relationship using the University database.
Practice Your Skills Example
The Department table and Course table are related through the common deptCode field. Both of these fields have the same data type declared in these tables. You can practice your skills in this exercise by creating the relationship between these two tables:
- Before re-creating the relationship to practice your skills, you must first remove the current relationship between the Department and Course tables. Display the Access Relationships window.
- Delete the existing relationships line (use your mouse to point and click on the relationship line, press delete, and follow through with the dialog box to delete the relationship).
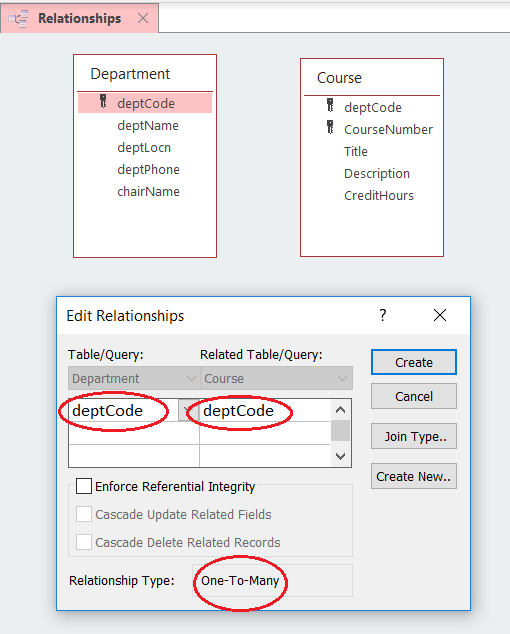
- Now, click and drag the deptCode field in the Department table and drop it on top of the deptCode field in Course table. On releasing the mouse, Microsoft Access will display the following dialog box:

Figure 5.4 Defining One-to-Many Relationship
- At this point, Access is requesting the user to confirm the proper fields are being related. The user needs to make a choice regarding Referential Integrity and ‘Cascade’ options.
-
- You should choose Enforce Referential Integrity in almost all cases as this helps reduce the chance of corrupting data.
- We will not be currently discussing ‘Cascade Update/Delete Related Fields’ in this chapter.
- Close the Relationship window.
- From the above example: When the user clicks Create, Access shows the relationships line with 1 on the one side and an infinity symbol on the many side of the relationship:

Figure 5.5 One-to-many relationship: department offers courses
5.2.2 One-To-One Relationship
If you drag a primary key field of one table to another table, and if the foreign key has unique values (a unique index exists for it) then you are creating a one-to-one relationship. For each row in the first table, there can be at most one related row in the other table. A row in the referenced table has a primary key value that equals the foreign key value in at most one row of the referencing table.
5.2.3 Many-To-Many Relationship
If you create a relationship in Microsoft Access where both fields you associated (via the click, hold, and drag sequence) do not have unique values (i.e. neither have unique indexes) then Access creates an ‘indeterminant’ relationship. In this situation, a row in one table, A, may be related to multiple rows in the other table, B, and where a row in table B may be related to multiple rows in the table A.
This is not done very often and corresponds to a many-to-many relationship. Most database designers would avoid this in their database designs. If a database designer is faced with two tables, A and B, that are related via a many-to-many relationship, the designer would likely introduce a third table, say C, where A and C will be related via a one-to-many relationship and similarly, B and C will be related via a one-to-many relationship.
Later in these notes, we discuss database design. We will see how many-to-many relationships can be decomposed into two one-to-many relationships.
Exercises
Relationships
For these exercises, use the Company database which does not have any Access relationships defined for the Employee and Department tables. The first few rows of Employee table and Department table data are as follows:
|
Employee |
||||
|
empId |
firstName |
lastName |
supervisor |
dept |
|
1 |
Tanya |
Dickson |
||
|
2 |
Heidi |
Herring |
1 |
1 |
|
3 |
Hiroko |
Hawkins |
1 |
2 |
|
4 |
Emmanuel |
Watkins |
1 |
3 |
|
5 |
Oliver |
Holt |
2 |
1 |
|
6 |
Raphael |
Delaney |
3 |
2 |
|
7 |
Basia |
Franks |
2 |
1 |
|
8 |
Bruno |
Pena |
2 |
1 |
|
Department |
|||
|
deptId |
department |
manager |
phone |
|
1 |
Marketing |
2 |
(204) 999-4444 |
|
2 |
Human Resources |
3 |
(204) 999-3333 |
|
3 |
Sales |
4 |
(204) 999-2222 |
- Consider the Employee and Department tables. Note: the Employee table has a field named dept which indicates the department where the employee works. The relationship can be stated:
- Each department has zero or more employees, and,
- Each employee works in at most one department.
Create a one-to-many “works in” relationship between Employee and Department. Enforce Referential Integrity between these tables.
- The Department table has a field named manager which indicates the employee who is the head of the department. The relationship is stated:
- Each department has one employee who manages that department, and,
- An employee may manage at most one department.
There is a unique index defined for the manager field and so you can create a one-to-one relationship “has manager” between Department and Employee.
-
- In the relationship window, add a second Employee table to the relationship window.
- There will be two (2) Employee tables on the diagram.
- Drag the PK empId field from Employee_1 table to the supervisor field of the Employee table.
- Enforce Referential Integrity between these tables.
- Save the Relationships that you have created for your database structure.
Note how Microsoft Access represents the relationships between these tables.

Displayed relationships using MS Access – Database Tools
- Consider the empId and the supervisor fields of Employee. Most employees report to someone – someone who is their supervisor. Only employee 1 does not report to anyone else. The supervises relationship can be stated:
-
-
- An employee may supervise many other employees, and,
- An employee reports to at most one other employee.
-
a) Create the supervises relationship. If you are doing this exercise after Exercise 2 then your relationship diagram has 2 copies of the Employee table. You may proceed onto understanding the hierarchical reporting structure in Step C.
b) If you are not doing this after exercise 2, then you must add Employee to the diagram twice so there are 2 copies of Employee on the diagram. Drag the PK empId field from Employee_1 table to the supervisor field of the Employee table. Note how Access draws this diagram.
c) Save the Relationships that you have created for your database structure.
d) Open the Employee table in Datasheet View to view the data representing the hierarchical reporting structure. The supervisor field correlates with the empID field.
e) The supervisor field is an implementation of a hierarchical reporting structure for our company. Use a piece of paper and draw the reporting structure for the company (for the data given at the start of these exercises).
We have started this exercise showing the reporting structure for the first 4 employees. For example, Tanya is the supervisor for Heidi, Hiroko and Emmanuel. As you analyze the data further, Heidi, Hiroko and Emmanuel would then supervisor additional employees in the database.

Queries
The following query exercises depend on the relationships diagram from the above exercises. When developing a query, you will see that MS Access will include relationships when you add tables in the upper pane of the Query Design window for a query.
Evaluate your table relationships carefully that your previously created. This will ensure that the tables included your queries will then have the correct one-to-many relationship between the Department and Employee tables. In these exercises, you will also need to create an inner join for Employee and Employee_1 tables. The displayed join between these Employee tables will only display rows where the joined fields from both tables are equal.

Upper Pane of the Query Design Window
- Create a query to list for each department, the name of the department and the name of its manager.
- Create a query to list for each department, the name of the department and the names of its employees (the people who work in the department). Sequence your results by department name.
- Create a query to list for each department, the name of the department head and the names of the department’s employees. Your query must list on each row of the result set the department name, the head’s last name, and the last name of each employee. Sequence your results by department name, and within department by employee last name.
- Create a query that lists each supervisor and the employees he/she is supervising. Your query must list, on each row of the result set, the last name of the supervisor and the last name of the supervised employee. Sequence the results by supervisor and within supervisor by employee.

