2 Creating Tables
Ron McFadyen
The typical Microsoft Access database comprises several kinds of database objects such as tables, forms, queries and reports. Each table represents a kind of entity (persons, places, things, events, etc.), or relationship between entities. For instance, if we are keeping track of departments and courses at our University database then we should have two tables:
Department: to keep information about departments
Course: to keep information about courses.
For each department, suppose we need to know things such as department code, department name, location of the department (an office number), phone number for the department, and the name of the department’s chair. Suppose departments can be identified by their department code (e.g. ACS) and by their department name (e.g. Applied Computer Science). Both of these fields are assigned by the University and each will be unique across departments. We will choose to use the department code as the primary key. We choose to use department code as the primary identifier for departments. We show Department with some sample data:
| Department | |||||
| deptCode | deptName | deptLocn | deptPhone | chairName | |
| ENGL | English | 3D05 | 786-9999 | April Jones | |
| MATH | Mathematics | 2R33 | 786-0033 | Peter Smith | |
| ACS | Applied Computer Science | 3D07 | 786-0300 | Simon Lee | |
| PHIL | Philosophy | 3C11 | 786-3322 | Judy Chan | |
| BIOL | Biology | 2L88 | 786-9843 | James Dunn | |
Figure 2.1 Department table
Suppose the creation of the Course table keeps track of courses offered by the University and includes the fields: course number, title, description and credit hours. At the University, what is a course number? The ways of identifying courses varies from one institution to another. A common way is to display the department code followed by the course number (e.g. “ENGL 2221”; “ENGL 2221”) which comprises two fields: a department code and a course number. We will use this convention and must include department code as a field in the Course table. The combination of department code and course number serve as a unique identifier (i.e. together they comprise the primary key). We show this Course table structure with sample data as follows:
| Course | |||||
| deptCode | courseNo | title | description | creditHours | |
| ACS | 1453 | Introduction to Computers | This course will introduce students to the basic concepts of computers: types of computers, hardware, software, and types of application systems. | 3 | |
| ACS | 1803 | Introduction to Information Systems | This course examines applications of information technology to businesses and other organizations. | 3 | |
| ENGL | 2221 | The Age of Chaucer | This course examines a selection of medieval poetry and drama with emphasis upon Chaucer’s Canterbury Tales. |
6 | |
| PHIL | 2219 | Philosophy of Art | Through reading key theorists in the history of esthetics, this course examines some of the fundamental problems in the philosophy of art, including those of the definition and purpose of art, the nature of beauty, the sources of genius and originality, the problem of forgery, and the possible connection between art and the moral good | 3 | |
| BIOL | 4451 | Forest Ecosystems Field Course | This is an intensive three-week field course designed to give students a comprehensive overview of forest ecology field skills. | 2 | |
| BIOL | 4931 | Immunology | Immunology is the study of the defense system which the body has evolved to protect itself from external threats such as viruses and internal threats such as tumor cells. | 3 | |
Figure 2.2 Course table
2.1 Using Design View to Create Access Tables
In this section, we will step through the process of creating a new table in a Microsoft Access database. From either the web page for these notes or as instructed by instructor, download and open the MyUniversity database (MyUniversity.accdb file).
1. Click on the Create tab (located in the Tables group) in the Ribbon. View the available table options by hovering the mouse over Table, Table Design and SharePoint Lists options.

Figure 2.3 Creating a new table using Microsoft Access – Table Design
2. Click Table Design option to begin a process to create your new Department table. A new table object is inserted into your database and the new table will open in Design View. A blank table object will be displayed where you can enter field definitions for your table. A field definition comprises field name, data type, and description. You can also set the table’s primary key. The Table design object is displayed as follows:
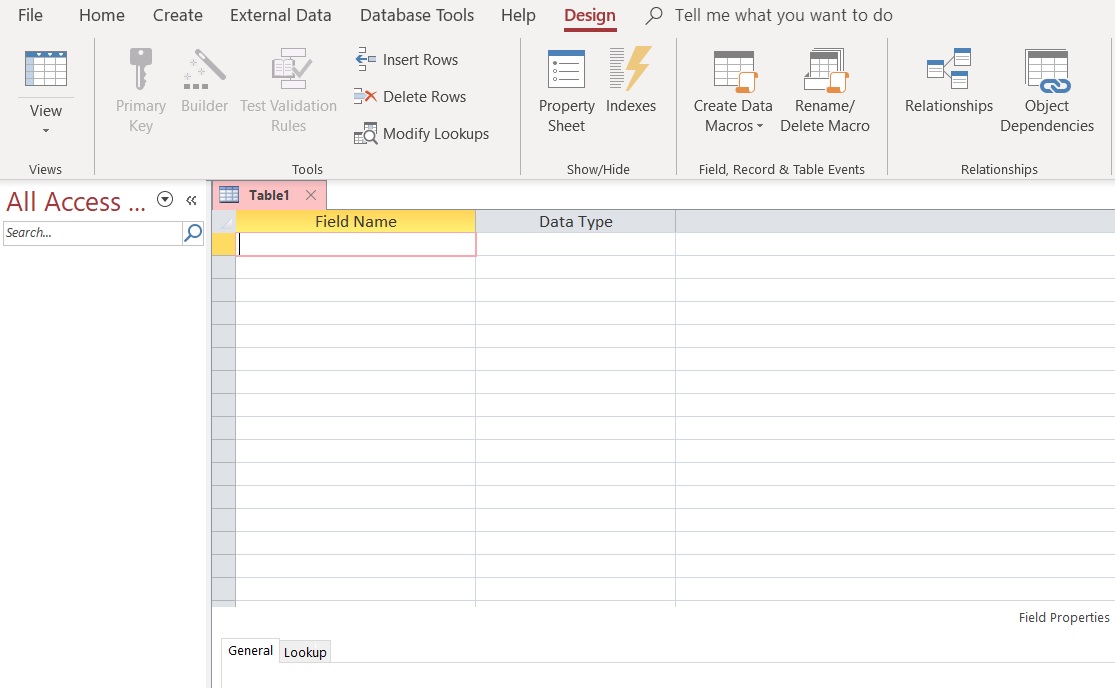
Figure 2.4 Microsoft Access – Table Design View
3. By referencing Figure 2-5, begin entering each field name and choosing the appropriate data type. The description column is optional and may contain a longer description of the field’s contents. This description contains comments that may be useful for someone who is viewing the table. Once you have done this, you should have a table design that looks like:
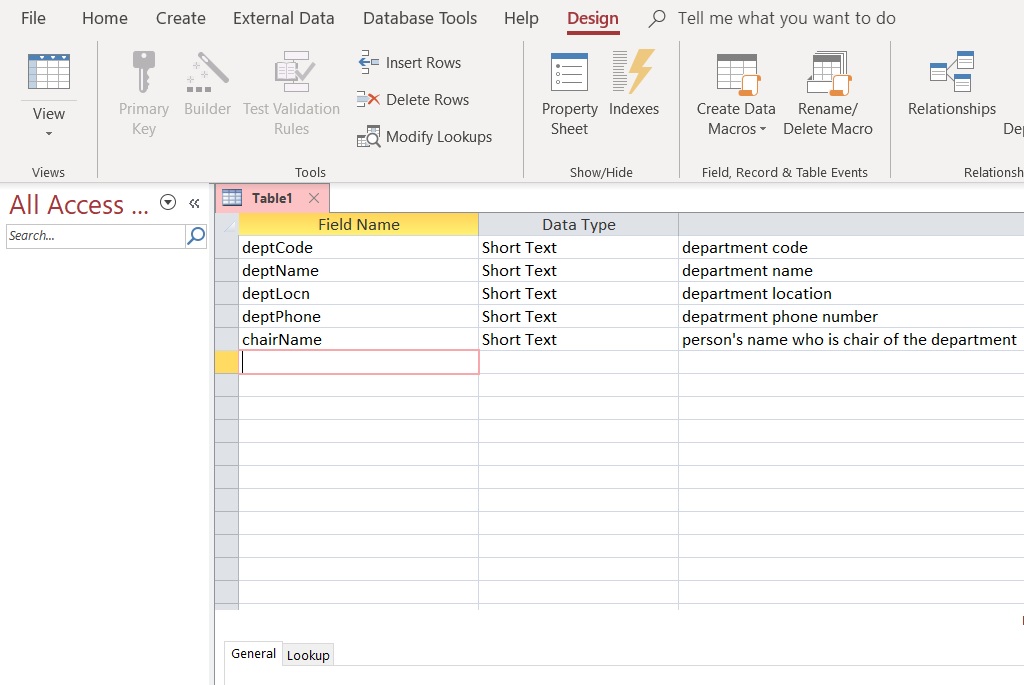
Figure 2.5 Microsoft Access – Department Table Design View
4. Next, we need to select and set the primary key for the table. The primary key is a field(s) with unique values associated with the table. The deptCode field will be the primary key field for the Department table. Click the mouse in the cell to the left of the deptCode field name. Locate the Primary Key command in the Table Tools – Design tab and in the Tables group. Click the Primary Key icon ![]() on the toolbar. As an alternative, you can right-click using your mouse on the deptCode field and select the Primary Key
on the toolbar. As an alternative, you can right-click using your mouse on the deptCode field and select the Primary Key ![]() command. Access uses the primary key
command. Access uses the primary key ![]() icon to show the deptCode as the primary key for the Department table:
icon to show the deptCode as the primary key for the Department table:
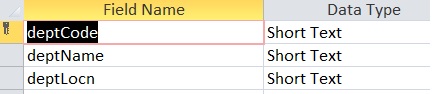
Figure 2.6 Setting the Primary Key
5. At this point, you should save your work by clicking the Save icon in the upper left hand corner of the form. You will be prompted to save the table. Save your table as “Department”.
You should still be in Design View for the Department table. Note that you can press the F1 function key on your keyboard to get help pertinent to the location of your mouse cursor. If your cursor is positioned on a field name and you press F1, you will see a window pop open that displays suggestions from Microsoft Access regarding how you should name fields. Try this. Before going any further, try pressing F1 in other locations on the table design view (i.e. Data Type and Description). We recommend that you read some of the information available to become more familiar with Microsoft Access.
2.1.1 Data Types
Microsoft Access provides several data types. We will discuss a few basic data types including Short Text, Long Text, Number, Date/Time, Currency, AutoNumber, Yes/No, Hyperlink, Attachment, Calculated, and Lookup Wizard.
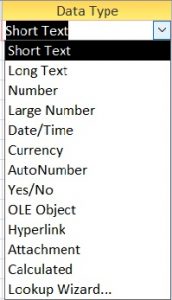
Figure 2.7 Microsoft Access Data Types
Short Text
If you specify that a field has the Short Text data type, Access will permit any alphanumeric characters to be placed in that field in a row of the table. This is a common choice when the data will not be used in calculations. The Short Text data type provides for values that have fewer than 256 characters. If you know that a maximum length is less than 255 characters, it would be appropriate to use the Field Size property (discussed in the next section) to limit the maximum length of a short text string.
Long Text
A designer selects Long Text if the field will have alphanumeric data longer than 255 characters. Long Text allows for a maximum length of 1 GB (gigabyte) of memory storage. You will need to remember that Access databases has a limitation of storing only 2 gigabytes of data. For example, consider the description field of the Course table. Could the description field be longer than 255 characters?
Number
If a field is used for storing values that are used in numerical calculations then Number is the appropriate data type except for calculations involving money (e.g. Currency type). Access Number data types (e.g. quantity ordered) contain example Field Size properties available for Byte, Integer, Long Integer, Single, Double, and Decimal options. The Field Size property (properties are discussed later) can be used to limit the number of storage locations used per value.
Date/Time
If a field contains date and or time values, then the Date/Time data type should be chosen. The Format property (discussed later) allows you to control how these values will appear to the user for date and/or time based data.
Currency
If a field will contain monetary values, the Currency data type should be chosen. Currency data type provides for numeric calculations that are accurate to 15 digits to the left of the decimal and 4 digits to the right of the decimal. This data type can be used to prevent rounding off currency values during calculations.
AutoNumber
If you choose AutoNumber, Microsoft Access will automatically generate the next value for you when a row is inserted into the table. By using the New Values property, you can arrange the numbers to be generated sequentially or randomly. Often control numbers for things like orders, invoices, registrations, etc. are numeric and we can leave it to the system to generate a next value for us.
Yes/No
This data type can be used for data that has only one of two possible values including Yes/No, True/False, On/Off.
Hyperlink
If you choose Hyperlink, you may store text/numeric values including website links (URLs) and email addresses.
Attachment
This data type allows you to include embeddable objects to attach to your database records. Attachments may include a variety of different files including examples of documents, spreadsheets, digital images, graphs, tables, and other types of files you may use.
Calculated
If you would like to create a calculation using fields from the same table, you can create a calculated field to store the result in a table.
Lookup Wizard
Sometimes you need to restrict values to a list of known values or to values appearing as primary key values elsewhere in the database. An example of known values could be considered for the creditHours field. The creditHours field could contain a stored value list of 1, 2, 3, and 6. The Lookup Wizard allows you to create this data type with helpful steps to allow you to make the appropriate wizard choices for your lookup data values.
2.1 Exercises
These exercises will refer to the Library database (as referenced in the previous chapter).
- Open the Microsoft Access Library database file.
- Open and evaluate the Member table. The id field was defined with the AutoNumber data type. Change the table view to Datasheet View. Experiment by adding new member records. You will note that id values increase by 1. Now try deleting the last two members that you added. If you add those members back in, what id values do they get? Are id values reused?
- Consider the Book table. Change the table view to Design View. Add a field named paperback that can be used to indicate whether or not a book is a paperback. Choose the Yes/No datatype. Save the design and switch to datasheet view. Now you will see how to enter such values. Microsoft Access provides a box that is to be checked, or not. You can select (a ‘Yes’) using the mouse or by using the space bar. You should experiment with this.
- Consider the Member table. Previously you added a gender field. Open the Member table in design view and change the datatype for gender to be Lookup Wizard. The wizard will automatically present 3 successive popup windows where you will:
i) Specify that you are providing the lookup values;
ii) Enter the values (Male, Female, and NotDisclose);
iii) Specify that values are to be limited to your list.
Save the table. Change the Member table to Datasheet view so you can test the datatype you have just created. You will notice the user sees a drop down list containing Male and Female, and the user cannot enter or select an inappropriate value into the table.
2.1.2 Properties
While creating Microsoft Access tables, each field must have a declared data type as discussed above. According to the data type, Access will present to you a set of field properties that you can apply to the table design for your data and how data is stored in the database. We will discuss the following: Field Size, Format, Input Mask, Caption, Default Value, Validation Rule & Validation Text, Required, Indexed, Show Date Picker, and New Values.
As referenced earlier in MyUniversity database, department table stores department information. Departments can be identified by the department code and department name. When you open the Department table in Design View, you can view the table design grid (top portion of the window) containing the declared field names, data types, and descriptions. In the lower portion of the window, you will notice the “Field Properties” section where you can specifically set the properties of a currently selected table field.
Field Size
In the Department table, let’s focus on the deptCode field and the associated Field Size property. Suppose the University uses 3 and 4 character values for department codes. The deptCode field property can be set to have a Field Size of 4. The Field Size property enables you to set a maximum size limit on data entered in that column to limit the possibility that an end-user accidentally types a longer string of characters and thereby enters incorrect data. In this way, we can limit the kinds of data entry errors users make when they input data into the table and thus improve the overall quality of our database structure.
Data integrity is a serious issue for databases. Setting Field Size for Text data and Number data is a common thing to do. Often organizations will limit the data they collect for fields such as last name and first name (for example, 30 characters). If the data type is Number then values selected for Field Size are values such as Byte, Integer, Long Integer, etc. These kinds of values are associated with an increasing number of memory locations used per value. A selection of Byte restricts storage to 1 byte of memory (8 bits), and since the largest positive integer that can be stored in a byte is 255, the values stored in the field are forced to be in the range from 0 to 255. Further information is readily available if you use the F1 function key on Field Size for a Number data type.
Format
The Format property is used to customize the way text, number, dates, and times are displayed to the end user. For instance, selecting Medium Date causes values like January 14, 2013 to be displayed as 14-Jan-13; selecting Long Date results in the display January-14-13. See figure 2.8 for these format examples. If you have Text data (such as department code), you could display the text in uppercase letters by specifying the > symbol as the format code. Another interesting Format specification is @;None. If this is used and there is no value to display in the field, the word “None” will be displayed in the field to the user. In this final example, consider the field for the student identification number (SIN). You may have seen these displayed to users with hyphens between the 3rd and 4th digits and the 6th and 7th digits. If the SIN is a Text field of length 9, it can be displayed using a Format specification of @@@-@@@-@@@.
| Value In Field | Format Property | Displayed as |
| michelle obama | > | MICHELLE OBAMA |
| January 17, 2019 | Medium Date | 17-Jan-19 |
| January 17, 2019 | Long Date | January-17-19 |
| @;None | None | |
| 786456789 | @@@-@@@-@@@ | 786-456-789 |
| @@@-@@@-@@@;None | None |
Figure 2.8 Format Examples
Input Mask
The Input Mask property allows the user to know how data will be entered into the table according to a specific pattern. This feature improves the overall quality and consistency of data entered in a database. When the cursor is in the Input Mask area, a ‘builder button’ appears. When you click this button, you will see a list of popular controls. If you were to choose the sample mask for a phone number, you will see the control !(999) 000-0000 appear. As a result of this choice, the user must enter a 7-digit phone number with an optional 3-digit area code.
Caption
The Caption property helps provide you with a descriptive heading for the defined field instead of simply displaying the field name. If there is no caption, the heading will display the Field Name for the data. Sometimes the field name is not what you want your users to see. Instead of displaying the field name, deptCode, as the heading above a list of department codes, you may prefer to use the words Department Code. To accomplish this, just enter the heading text in the Caption property for the field.
Default Value
To help you expedite time when entering data into your database, you can include a default value for a table field. If there is a common value for a field, you should consider setting a default value which will automatically appear in the field for all new records. For example, if most courses are 3-credit hour courses then the value 3 can be set as the default value for all new courses.
Validation Rule & Validation Text
When you enter data into a database, validation rules limit what data is entered into the field to improve data quality in the table. If a field has a validation rule then the rule is tested whenever the user enters data. If the test fails, the user is prompted with a message containing the validation text. To apply a validation rule, you could enforce the number of credit hours to be less than 10 by entering the rule <10. The validation text to support the validation rule would display Please enter a value between 0 and 10.
Required
You can make a field contain a Required property according to the mandatory information that needs be entered into the column in an Access table. Consider the deptName field in the Department table. If a user enters data for a new department then it is unreasonable for the deptName field to not have a value. To ensure there will be a required field in a table, we would select Yes for the Required property setting.
Indexed
Microsoft Access automatically creates an index (unique – no duplicates) on a field that is the primary key. A unique index is a special internal data structure that Access builds to facilitate two things:
(1) to ensure fast access to rows of data when the user specifies a value for such a field in a query, and
(2) to ensure in the case of no duplicates that no two rows of the indexed table could have the same value for that field.
The index data structure is very similar to the index you see at the back of a book. An index comprises several entries where each entry has a value (a term used in the book) and a reference (a page number in a book). In the case of duplicates allowed, there can be several references (several pages where the term appears).
You may choose to have an index on any field. If a field could have duplicate values then you must choose an index that allows duplicates.
Show Date Picker
If the data type is Date/Time, this selection option enables you to select a date using the date picker with a displayed calendar icon. In the table’s Datasheet view, the calendar icon will display to the right of the chosen field where you would like to enter your date. Click the calendar icon, select your desired date, and the proper calendar control will display. This is a convenient tool for data entry to ensure the accuracy of a selected date from the displayed calendar icon.
New Values
As you recall, Autonumber is a data type which will automatically generate incremented values as the primary key in the Datasheet View. In your Access table, click Design View and select the primary key field. If the table design data type is AutoNumber, you can choose New Values (Field Property) to specify whether the next value for the field will be the next highest integer or it will be a random integer.
2.1.2 Exercises
In this exercise, you will be using your MyUniversity database.
- Open the Department table. In design view:
- Set the deptCode field to have a length of 4. Use > (greater than symbol) as the display format to display deptCode text as uppercase text.
- Set the length of the deptPhone field to be 10.
- Choose the Phone Number input mask for the deptPhone field.
- Save the Department table.
- Switch to Datasheet View for the Department table.
- Use Figure 2.1 Department Table as a guide to enter data into the Department table.
- Create a new Course table. In design view:
- Add the following attributes to include department code, course number, title, short description, and credit hours.
- Set department code, course number, description and title fields with Short Text data types.
- The credit hours field should have number data type with no decimal places..
- Set the deptCode field to be Short Text with a length of 4 so that it matches the properties of deptCode in the Department table. Later, it will be important that the deptCode field in both Department and Course are defined the same.
- Use Figure 2.2 Course Table as a guide and enter data into the Course table.
- Note: Data entered into description field should accommodate Short Text data type. If there are additional characters entered in field, the data type should be changed to Long Text data type.
In this exercise, you will be using the Library database.
- Consider the firstName and lastName fields in the Member table of the Library database.
- Modify the caption for these fields to be First Name and Last Name respectively.
- Save the table and reopen in Datasheet View. You will see these captions at the top of their respective columns.
- The Loan table has fields that are defined with the Date/Time data type. Experiment applying different formats for these dates.
- Consider the id field in the Member table of the Library database. In Design View, change the increment property of the id field to be random (instead of increment). This is a non-reversible action (but you can download the database later to get a fresh copy). Now add some new members. What can you say about the id values that are assigned?
- Validation rules and validation text are important features to assist database users.
- Consider the Loan table and its date fields. Microsoft Access has many built in functions one of which is Date() which always returns today’s date.
- To ensure that someone always enters a due date later than today, enter the following properties for the dateDue field:
Validation rule: >= Date()
Validation text: Enter a future date.
In this situation, we are entering a field-level validation rule. These rules are useful when we can state a requirement independent of other fields. Test the effect of this validation rule by switching to Datasheet View and entering valid and invalid values for the due date.
-
- To ensure the date borrowed value is less than or equal to the date returned value, we need to construct a validation rule that involves two fields. Microsoft Access will not let you enter this rule at the field level; instead, such a rule must be specified at the table level. To enter a table level rule,
- In Design View in the Loan table, click on the dateBorrowed Field Name.
- In the Show/Hide group, click on the Property Sheet button to display the Loan table properties. The Property Sheet pane will be displayed on the right side of your window.
- To ensure the date borrowed value is less than or equal to the date returned value, we need to construct a validation rule that involves two fields. Microsoft Access will not let you enter this rule at the field level; instead, such a rule must be specified at the table level. To enter a table level rule,

Figure 2.9 Property Sheet button
-
- Enter the the following table properties for the dateBorrowed field:
Validation rule: [dateBorrowed]<=[dateReturned]
Validation text: Date returned cannot be prior to date borrowed.
The square braces, [ ], that appear in the expression are required. These square brackets reference the field names in the Access table.
-
- Enter this rule and verify that it prevents the user from entering improper dates.
2.1.3 Primary Keys
This section will require that you have previously created the Department and Course tables in your MyUniversity database.
When designing and creating a database, every table should have a declared primary key field(s) which will contain unique values. The purpose of a primary key is to establish relationships between tables and key fields in a relational database. In the MyUniversity database:
- The Department table has declared deptCode as the primary key.
- The Course table has a composite primary key – a key formed using two attributes: deptCode and courseNo.
To set a primary key, the table must be open in Design View. The primary key field is displayed as the first field in the table field names. You must select the field (or combination of fields) and then click the Primary Key icon. The deptCode is the primary key for the Department table. The Course table comprises two fields as its primary key which uniquely identifies each record. Since the primary key involves more than one field, this primary key is referred to as a composite key.
2.1.3 Exercises
In this exercise, you will continuous using your MyUniversity database.
- Set the primary key for the Department table. With the Department table in Design View, select the deptCode field and then click on the Primary Key button. When done successfully, you will see the deptCode field with a key icon beside it:
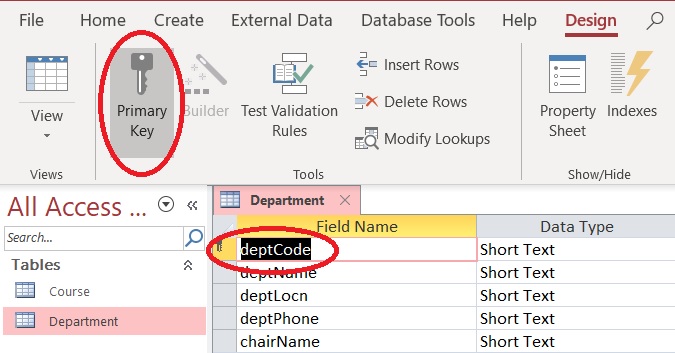
Figure 2.10 Setting the Primary Key for the Department table
If Microsoft Access rejects your primary key, you must examine the data values you previously entered for deptCode in the table. The error could occur due to duplicated record values. If this happens, you must view the table in Datasheet View and find the duplicated value and make necessary changes.
Once Access has accepted your primary key, you should open the table in Datasheet View and experiment: How does Access respond if you try to create a new row with an existing primary key value?
2. Set the composite primary key for the deptCode field and CourseNo field in the Course table. Begin by first selecting the first field key field in the table. While holding the CRTL (control) key down on the keyboard, select the other field. With both fields selected, click the Primary Key button:
a. Select the deptCode (click the cell to the left of the deptCode field).
b. Select the next field to be part of the PK. Hold down the CTRL (control key) on the keyboard. Click the courseNo field (and now release the CTRL key).
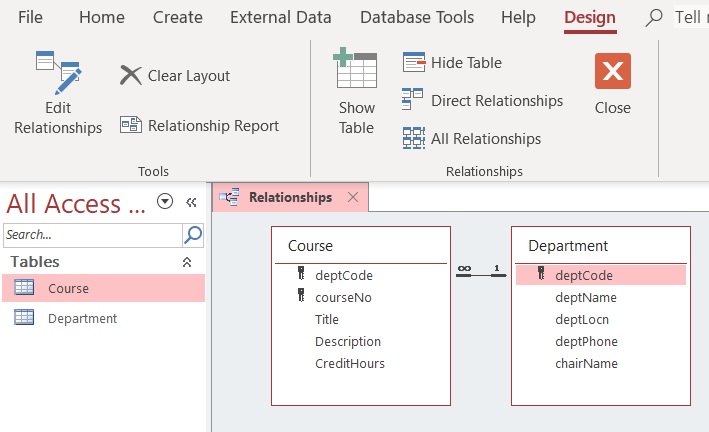
c. Click the Primary Key icon and save your table. You will now see the key image beside both fields as in:

If Microsoft Access rejects your primary key, you must examine the values you previously entered for deptCode and courseNo for duplicate value(s). If this happens open the table in Datasheet View and examine the rows to find duplicate values of the combination {deptCode, courseNo}.
Once Access has accepted your primary key, you should open the table in Datasheet View and experiment: How does Access respond if you try to create a new row with an existing primary key value?
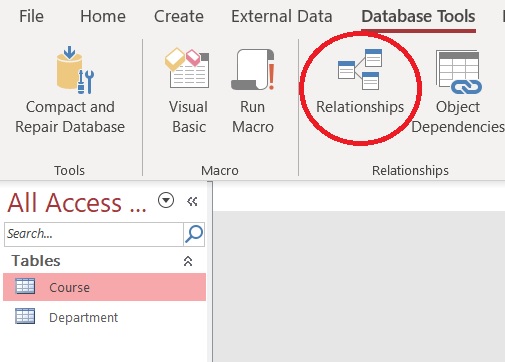
3. Advanced: Later on, we will discuss the different types of relationships between tables. Perhaps, you are curious on how relationships are created? The Department and Course tables are related to one another through the deptCode field. It is reasonable for us to expect that a deptCode value in a row of the Course table also appears in a row of the Department table. If we are recording a course for the mathematics department then we expect the database to have a corresponding row in the Department table. To ensure this is the case, a formal relationship between these two tables using the Relationships Tool can be created as follows:
a. Select the Database Tools tab, in the Relationships group, click the Relationships command:
b. The Relationships Tool opens and you will see a blank relationships diagram.

c. From the list of tables, select both Department and Course, and then click Add.

d. With both tables showing on the diagram:
-
-
-
- Select the deptCode primary key field in the Department table, drag deptCode field to the Course table, and release the mouse button above the deptCode field in the Course table.
-
-
-
-
-
- Verify the accuracy of the established relationships between the Department and Course tables.
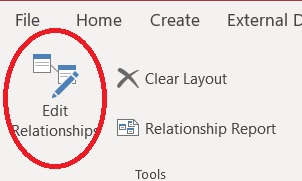
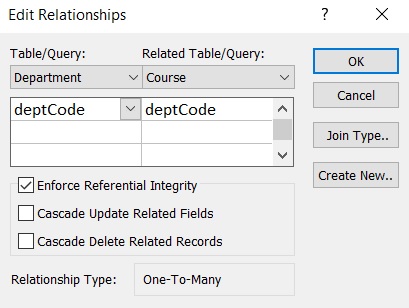
- On the Ribbon, click on the Edit Relationships button and the Edit Relationships dialog box appears.
-
-
-
-
-
- Verify that the table names and associated field names are the common fields displayed for this relationship. If a field name in the Edit Relationships dialog box is not correct, click on the drop-down dialog box for the incorrect field name, and select the appropriate field name displayed in the Table/Query list.
- If you follow these instructions, you will be able to enforce referential integrity (RI).
- To enforce referential integrity for the relationship between Department and Course tables, click on the Enforce Referential Integrity check box.
-
-
-
-
-
- If referential integrity is enforced then it becomes impossible to have a row (record) in the Course table without a matching row in the Department table.
- If you attempt to create relationships in your database:
- Examine if there is an existing relationship saved in the database.
- If there is an existing relationship saved between two tables, the existing relationship will need to be removed before modification.
-
-
