6 Microsoft Access Queries – Advanced
Ron McFadyen
Previously in Chapter 4 – Microsoft Access Queries, we learned how to construct simple queries using logical expressions including AND criteria and OR criteria to query different types of conditions. Now, we will examine more complex database query situations.
6.1 Logical Expressions
Sometimes we need to retrieve data based on multiple criteria which are expressed as logical expressions involving the logical operators and, or, and not. For example, a student using the University database might want to know which courses are offered by the Chemistry and Physics departments which are not 6 credit hour courses. The criteria can be restated with emphasis on logical operators:
-
- A course is a Chemistry course or a course is a Physics course, and
- The course has any value for credit hours but not 6.
The criteria applied in this example involves and, or, and not. Stating the requirements in our natural language may seem easy to understand. If we state these expressions in an Access Query By Example (QBE) design window, the expressions will require criterion placed in the applicable Criteria row(s).
Microsoft Access provides a way for us to specify the above using the Criteria and Or lines in the Query design Grid. We will consider each of the operators And, Or, and Not.
6.1.1 AND Criteria
If one specifies multiple criteria on one line in the Access query design grid area, these criteria are identified with AND. For a row to contribute to the result of the query, the row must satisfy all the criteria which will result with fewer records being displayed.
Example
Suppose we want a list of all ACS 3 credit hour courses. We need to obtain the rows in Course where the logical expression
(deptCode=”ACS”) AND (creditHours=3)
is true. We code this in QBE as:
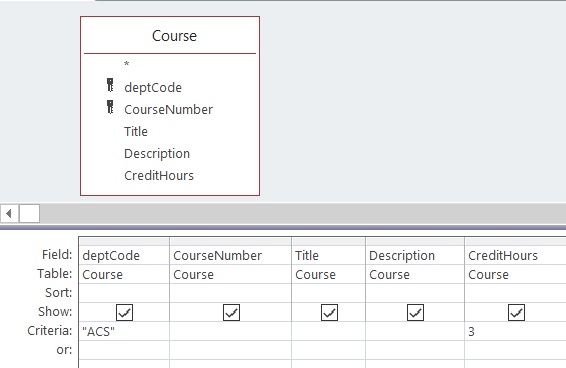
Figure 6.1 Query design containing two expressions with AND criteria
6.1.2 OR Criteria
While one specifies multiple criteria on alternative criteria lines in the Access query design grid area, these criteria are identified with OR. For a row to contribute to the result of the query, the row must satisfy at least one criteria to be true and then the row will be displayed.
If for some row either one or both of the sub- expressions evaluate to true, then the row will be selected for display. This will result with more records being displayed from your Access query.
Example
In this example, we can use a combination of criteria identified with AND and OR. If one specifies multiple criteria on both the Criteria lines and OR lines, the criteria on each criteria line is ANDed, and those evaluations on alternative criteria lines are then ORed.
Suppose we need a list of all ACS courses that are 3 or 6 credit hour courses. Logically, we can express this as:
(deptCode=”ACS” AND creditHours=3) OR
(deptCode=”ACS” AND creditHours=6)
We code this in QBE as:
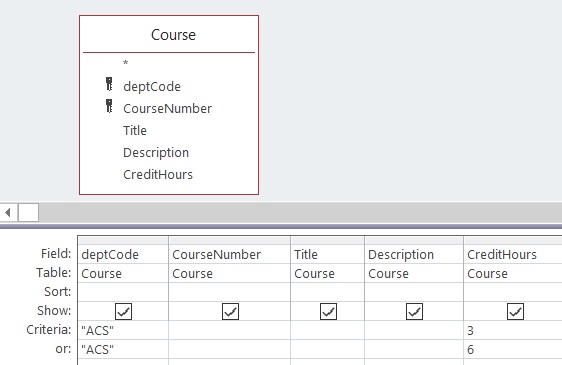
Figure 6.2 Two expressions that are ORed
6.1.3 NOT Criteria
While AND and OR criteria compare expressions, the NOT logical operator negates a logical expression.
Example
To get a list of 3-credit hour courses, we would use a criteria of 3, but to list courses that are not 3 credit hours one could use the criteria: NOT 3, which, written in long form is:
NOT (creditHours = 3)
Coding this in QBE we have:
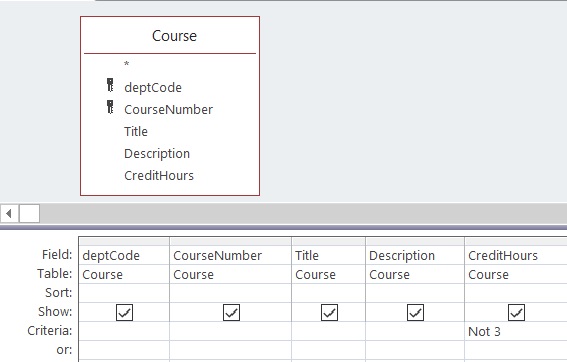
Figure 6.3 Using NOT
6.1 Exercises
While using your MyUniversity database, create and save the following Access queries to:
- List all courses either in the Mathematics department or Statistics department.
- List all courses either in Mathematics or Statistics where the credit hours are greater than 1 for both courses.
- Lists the titles of courses offered by the Chemistry department or courses offered by the Physics department that are not full courses (that is, they are not 6 credit hour courses).
- List all 3 credit hour courses that are not ACS courses or all 6 credit hour courses that are not ACS courses.
6.2 Query Operators
We will present two additional query expression operators including LIKE and IN. LIKE is used for pattern matching of text values and IN is used to test for inclusion within a set.
6.2.1 LIKE Operator
Sometimes we need to retrieve information based on partial character comparison information. Consider someone using the University database and wanting to find courses where the course description contains the word “computer”. To find courses matching this criterion, we can use the Like operator where we specify an appropriate pattern. These patterns are defined using one or more wildcard characters. By default our Microsoft Access databases use the ANSI-89 standard for special wildcard characters.
Note: At some point, you may want to investigate the more recent ANSI-92 standard for wildcards. You can change the standard your database is using by examining and changing the Microsoft Access Options for Object Designers/Query Design.
The ANSI-89 wildcard characters are:
|
Wildcard Character |
Matching criteria |
Example |
|
* |
Matches any number of characters |
Like “1*” matches all text strings that start with “1” |
|
? |
Matches any single character |
Like “a?c” matches “aac”, “abc”, “acc”, etc. but does not match longer strings such as “aacc” or “xabc” |
|
# |
Matches any single numeric character |
Like “b#b” would match “b2b” and “b7b” but not “bam” |
|
[] |
Matches any single character within the brackets |
Like “j[ai]m” matches “jim” and “jam” but not “jaim” |
|
! |
Used with [ ] when you do not want to match any of the enclosed characters |
Like “b[!ao]b” matches “bim” and “bub” but not “bam” or “bob” |
|
– |
Used with [ ] to specify a range of matching characters (given in ascending sequence) |
Like “b[0-9]b” would match to “b2b” but not to “bam” Like “b[a-c]b” would match “bab”, “bbb”, and “bcb” |
Figure 6.4 ANSI-89 Wildcard Characters
Example
To list courses where the description begins with “This course”, you need a pattern where you specify that a text value begins with “This course” which can be followed by anything else: “This course*” .
In the Access query QBE grid, you enter the criteria for title: Like “This course*” :
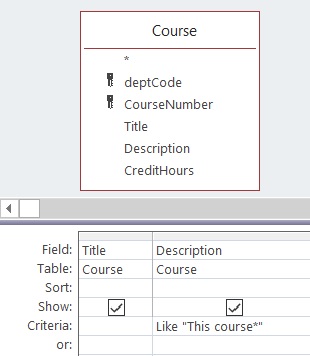
Figure 6.5 Using LIKE
6.2.2 IN Operator
The IN operator can be used if you need to determine if a field value is in specific list of values. The list of values is a comma-separated list enclosed in parentheses; for example (1, 3, 6)
Example
In the Access query QBE grid, use the IN operator in the University database. To list those courses offered by the Physics, Statistics and Mathematics departments you need a list of values: (“PHYS”, “STAT”, “MATH”)
Using QBE, we code IN (“PHY”, “STS”, “MTH”) in the criteria line:
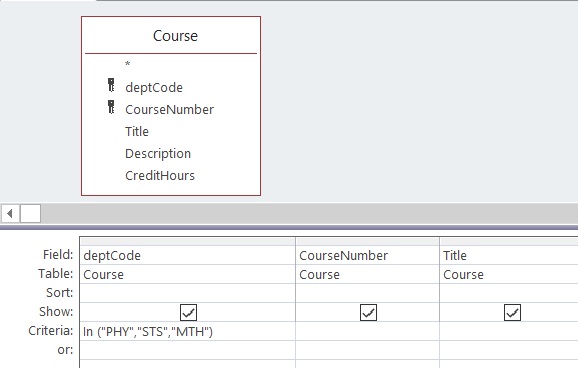
Figure 6.6 Using IN
To exclude those courses not offered by the Physics, Statistics and Mathematics departments, we code NOT IN (“PHY”, “STS”, “MTH”) in the criteria line.
Note: Using IN is equivalent to using three simple logical expressions that are ORed, and is a convenient way of expression if there are several values in the list:
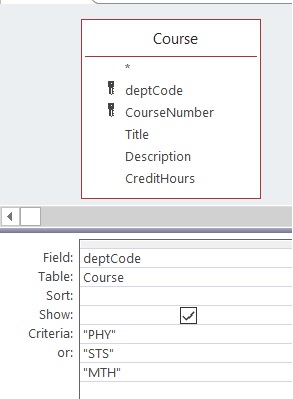
Figure 6.7 IN vs OR Operators
6.2 Exercises
Develop the following queries using your MyUniversity database to:
- List courses offered by Physics or Applied Computer Science where this course description contains the word computer.
- List courses where the course description contains the word computer but where the course is not offered by the Applied Computer Science department.
- List courses where the credit hours are 1, 3, 6 or 9.
- List courses where the credit hours are not 1, not 3, not 6, and not 9.
6.3 Query Properties
Continue using your MyUniversity database from the previous 6.2 Exercises. Re-open one of queries you created using the query operators. In the upper-right area of a query in Query Design View, you will see a button labeled Property Sheet.
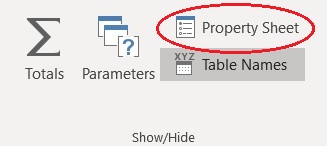
Figure 6.8-A Identifying Access Property Sheet button in Query design
Click the Property Sheet button. In the Property Sheet, you will see properties for a field in the Grid, or, for the query itself, depending on where the cursor is located. Click the mouse in an open area in the Relationships Diagram (upper pane in Query design displaying the added table) and you will see properties for the query. Two query properties we will discuss include Top Values and Unique Values.
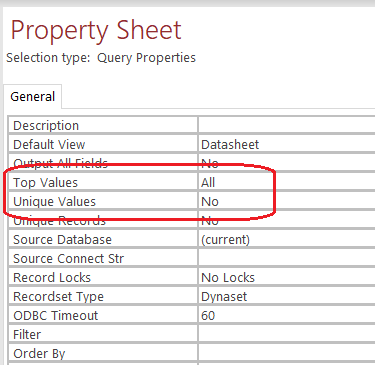
Figure 6.8-B Query Sheet properties
6.3.1 Top Values Properties
You can change the selection property for Top Values to display ALL records in a table or a partial subset of the records in a table. The default is ALL which results in all rows displayed when the query is executed, but you can also use this property to limit the number of displayed rows. As indicated below, you can select an option or manually type a specific number of rows such as 5, or a specific percentage of rows to be displayed when the query is executed.
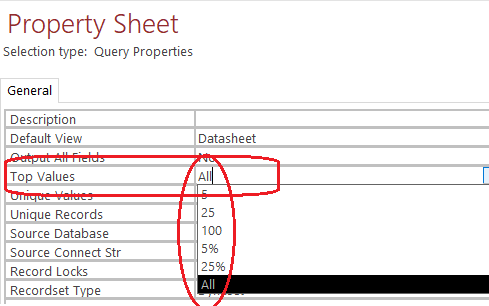
Figure 6.9 Setting the Top Values property
Example
Open the Library database that you previously used in this text. Use the Library database where the Member table has one row per member. Sample data is shown below:
|
id |
firstName |
lastName |
gender |
birthDate |
|
1 |
John |
Smith |
Male |
15/05/1999 |
|
2 |
David |
Martin |
Male |
06/08/2000 |
|
3 |
Betty |
Freeman |
Female |
18/09/1997 |
|
4 |
John |
Martin |
Male |
11/09/2000 |
Figure 6.10 Sample Library Members
Scenario: Suppose we wanted to know who is the youngest member. One way to find out is to sort the members by birthdate and then pick either the first or last row according to how you ordered them (descending or ascending).
Solution: Consider the following where the members are sorted in descending order by birthdate and then we list the first row by specifying Top Values = 1:
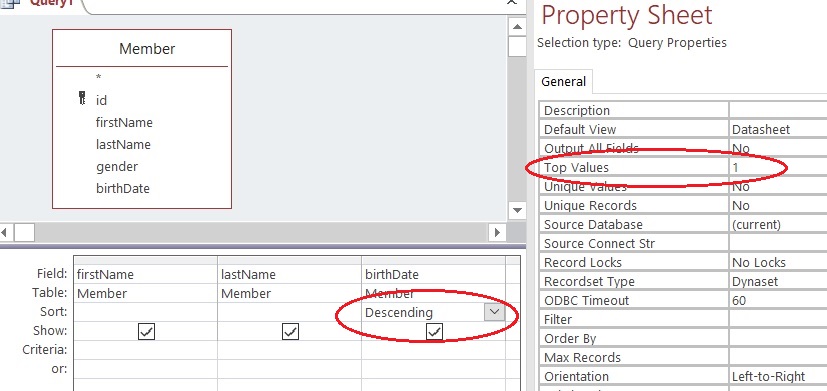
Figure 6.11 Viewing the youngest member using the Top Values property = 1
From the Member table data, the executed query produces the following result:
|
firstName |
lastName |
birthDate |
|
John |
Martin |
11/09/2000 |
Figure 6.12 Query returns one result row
6.3.2 Unique Values Property
While creating your Microsoft Access query, there is a Unique Values property option. If the Unique Values property is set to Yes then Access will search for unique values in the field and eliminate duplicates rows from the result.
Example
Suppose a librarian wants a list of authors from the Library database. If we use a query to list the authors but we do not set Unique Values to Yes then the result could show an author several times, once for each of his/her books. The following result set shows Jeo Celko listed 3 times:

Figure 6.13 Query displaying duplicate records
We can eliminate such duplicates by specifying Unique Values = Yes as in:
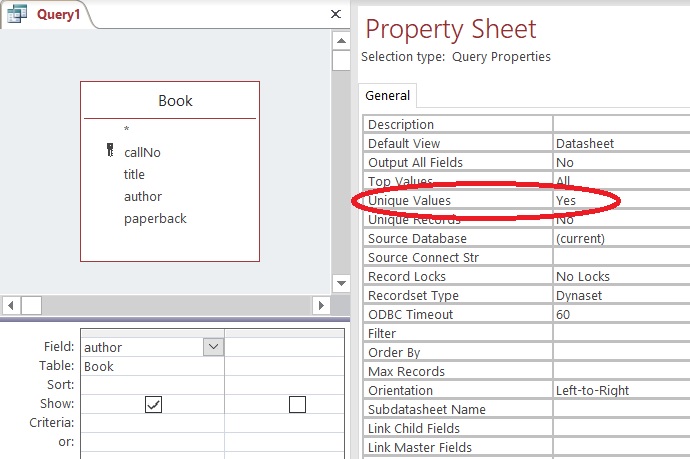
Figure 6.14 Query Property Setting Unique Value to Yes
Instead of 11 names being displayed, this query would only list the 9 different author names.
6.3 Exercises
- Consider using the Library database. Answer the following questions by creating the following queries.
- Which member is the oldest?
- Which book was the first one to be taken out on loan?
- Which books have been taken out on loan? Any book listed should be listed only once – no duplicates.
- Consider using your MyUniversity database.
- Create a query to list the department codes (with no duplicates) of departments that offer 6 credit hour courses.
- Modify your query to list the department names too.
- Consider the Company database and its Employee table. Answer the following questions by creating the following queries.
- The empId field is assigned values sequentially starting at 1. What is the last empId value that was used? (What is the empId for the last employee added to the table?)
- Write a query to determine the name of the oldest employee.
- Write a query to list all of the employee last names. If at least two employees have the same last name then this list will be shorter that a list of employees.
- Suppose there is a field hireDate which holds the date when an employee was hired. Write a query to determine the name of the employee who was most recently hired?
6.4 Totals Query
A Totals query allows you to summarize information in the database. When you summarize data from one or more tables, you are either:
- Producing summary data for the whole table, or
- Producing summary data for specific groups.
For instance, you may want to know:
- How many courses there are?
- The average of the credit hours?
- The number of courses in each department?
You can create this Totals query by applying the Microsoft Access aggregate Totals function. To create a Totals query, you begin by creating a simple query that retrieves all the attributes that will be needed to be summarized. Click the “Totals” icon button in the “Show/Hide” button group (upper-right hand corner of the Microsoft Access window):
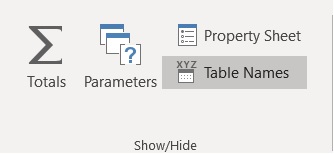
Figure 6.15 Totals icon button
When you click the Totals icon, the QBE Grid will add the Total line to your query. You will now see “Group By” displayed for each field in the grid. You must choose from the available drop down options:
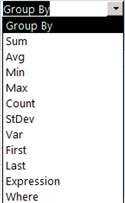
Figure 6.16 Choices for Aggregate Total line
For each field in the grid you choose one of:
- “Group By”: if the field is used for grouping
- An aggregate function: if the field is to be summarized using that function. We will consider the standard set including sum, average, minimum, maximum, count.
- “Where”: if the field has criteria to be used for selecting rows. Only rows satisfying the criteria contribute to the grouping and display of results.
Example
The simplest type of totaling query displays an aggregate over an entire set of rows. Consider referencing the University database. For example, to sum the credit hours over all courses in the MyUniversity database one can use:
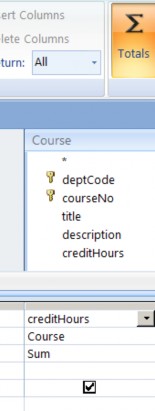
Figure 6.17 Determining the total for one field over all rows
This query summarizes the entire table when executed. The result of this query is one line displaying a sum for all credit hours and courses.
Example – Count
Typically, the use of the Totaling feature is more complicated. Consider the University database and that we now need to obtain a count of the number of courses offered by each department. Counting the number of items in a field is different from the previous Totals query using the Sum function.
We begin with a query that lists the department code and any other field in the Course table. (CourseNo is a good choice because it can never be null. Nulls are passed over when the counting of field values is performed). The query below lists the fields we need:
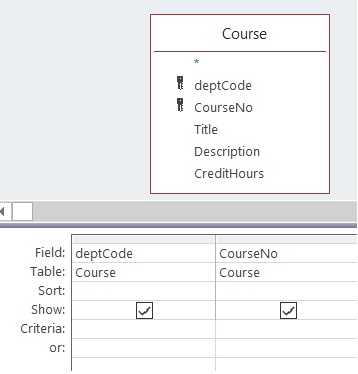
Figure 6.18 Step 1: Identifying the needed Course table fields
In the upper right-hand corner of Design View for queries, you must click the Totals icon. When you click the Totals icon a new line (Total line) is added to the grid:
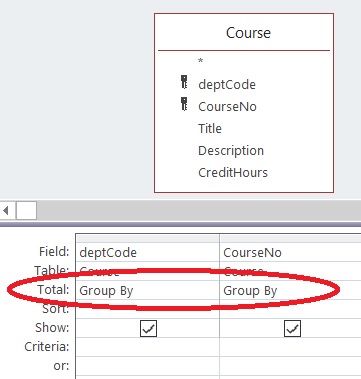
Figure 6.19 Step 2: Total line is added to the QBE grid
By default, Microsoft Access sets each field up for grouping. To count the number of courses in each department, you must click in the Total area for courseNo and change from Group By to Count:
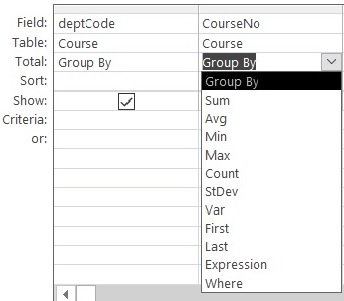
Figure 6.20 Step 3: Choose the appropriate aggregate for the group
Now you have a query that will show the value of each department code along with a count of the number of courses for the department. This query produces a count for one row per department.
To Review:
Note: The first 5 aggregate function choices in Figure 6.20 are part of the SQL (structured query language) standard including: SUM, AVG, MIN, MAX, COUNT. They perform a sum, average, minimum, maximum or count over the values found within a group. When a Totaling query is executed, the following actions are performed by Microsoft Access:
- Rows are retrieved from the underlying table(s): Recall that when Where is specified in the Total line then there is criteria that must evaluate to true for a row to be part of this result.
- The retrieved rows are organized into groups where the rows forming a group have the same value for the grouping field(s).
- For each group, aggregates are evaluated.
- A group can be eliminated from the results: If there is a criteria specified for a group and if the criteria evaluates to false, the group is excluded.
6.4 Exercises
Create and execute queries for the following exercises.
- Use your MyUniversity database to consider the last example where the number of courses per department is listed. The sample database is small and so many departments have just 1 course. Modify the query to list results only for departments where there is more than 1 course. For this you must include a criteria >1 for the field where COUNT is specified:
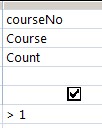 1 for the Course field.” width=”102″ height=”128″>
- Consider your MyUniversity database to create queries:
- For each department list the department code and the largest value for credit hours.
- For each department list the department code, department name, and the number of courses.
- Consider using the Library database to create queries:
- List the number of books that have SQL in the title.
- List the number of members by gender.
- What is the total for fines?
- Consider using the Company database to create queries:
- List the number of employees in each department.
- List departments that have more than 25 employees.
- For each employee who is a supervisor, list the supervisor name and the number of employees they supervise.
- Suppose the Employee table has a salary field holding an employee’s salary. What is the average salary?
6.5 Parameter Query
If you need a query but the criteria will not be known until run-time, you use a parameter query. When we compare the previous select queries that have been created with parameter queries, they are very similar in design. A parameter query design uses square brackets [ ] on the Criteria line for a selected field which will allow the user to type inside the [ ] for a prompt when the user runs the query. When a user runs a parameter query, Microsoft Access will show the user the prompt and waits for the user to respond with a value for the parameter. Microsoft Access replaces parameters with the user-supplied values just before it executes the query.
Example
Suppose a user using the University database needs a list of courses having a specific value for credit hours. The query below has a parameter in the criteria line for creditHours:
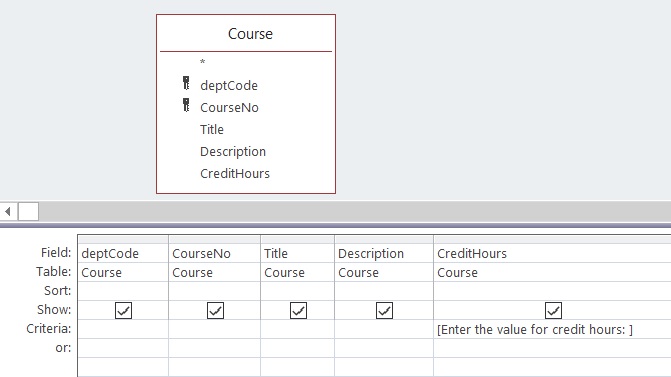
Figure 6.21 Parameter query
When the query is run, the query is temporarily suspended. The user is prompted with the message as provided in the square braces [ ]. Once the user responds to the prompt, the running of the query continues with the value the user entered as the criteria value.
6.5 Exercises
- Consider using your MyUniversity database to create a query to:
- List all courses in a department (for which the user supplies the department code).
- List all course titles where the user supplies both the department code and the credit hours. Note that two separate criteria, each with their own parameter, must be specified.
- Consider the Company database to create a query to:
- List the employees who manage a department where the department code is provided by the person running the query.
- List all employees in some department where the department code is provided by the person running the query.
- Modify the employee data in the Company database so at least two employees have the same first and last names. Develop a query that lists all employees having a specific first name and last name that will be specified by the end user.
- Consider the Genealogy database to:
- Create a query with two parameters: a start date and an end date. The query will list all persons whose birth dates fall in the range from start date to end date.
- Consider the Library database to:
- Create a query to list books due on a specific date (a parameter).
- Create a query to list books written by a specific author (a parameter).
6.6 CrossTab Query
Standard Microsoft Access queries produce results with column headings. Crosstab queries are queries where results are displayed with both row and column headings similar to a spreadsheet. Crosstab queries can also utilize aggregate functions that can consolidate data into a group and displayed using row and column formatting styles.
We will limit our discussion to the use of the Crosstab Query Wizard for creating our crosstab queries with your MyUniversity database.
Example
As an example, suppose we wish to display for each department a count of the number of 3 and 6 credit hour courses. The counts are to appear in matrix format where rows are labeled with department names and the columns appear with labels 3 and 6. Below is an outline of how the results should appear:
|
3 |
6 |
|
|
Chemistry |
16 |
7 |
|
Mathematic |
22 |
11 |
|
… |
… |
… |
Figure 6.22 Query results to appear with row and column headings
Crosstab queries have at least three fields: one field (department code) is used for row labels, another field (credit hours) is used for column labels, and one field (course number) is used with an aggregate function (Count).
We can begin by creating a simple query using the MyUniversity database that retrieves all the necessary values:
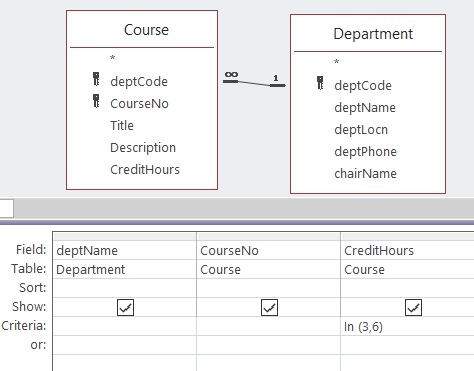
Figure 6.23 Query with required fields
Next, we save the query (say Q1) and create a new query using the Crosstab query wizard. The wizard prompts for
- The table/query to use as the basis for the new crosstab query (the query just saved –> Q1)
- The field to use for row labels –> deptName
- The field to use for column labels –> creditHours
- The field and the aggregate function to use for summarizing data –> courseNo / Count
Running the query shows several columns: the department name (values in this column are the row labels), total over the remaining columns for the row, columns for credit hour values 3 and 6 (the column labels). For example:
| CrosstabQuery | |||
|
Dept Name |
Total Of courseNo |
3 |
6 |
|
Statistics |
16 |
15 |
1 |
|
Mathematics |
18 |
6 |
12 |
Figure 6.24 Standard Crosstab Query results
6.6 Exercises
While using your MyUniversity database, create and save the following Access query to:
- Create and run the query to display for each department a count of the number of 3 and 6 credit hour courses.
- Modify the query so that credit hour values appear as row labels and department names appear as column labels.
6.7 Action Queries
Action Query is a category that Microsoft Access uses to distinguish queries that can modify the data in the database. We will discuss the query types including: Make-Table, Append, Delete, and Update.
To create an action query, one typically starts by creating a Simple Query that is subsequently changed (by clicking the pertinent button) to an Action Query type. You will notice that as you experiment running action queries, Microsoft Access gives a warning message asking you to confirm the changes the query will make to the database. It would be recommended to first make a backup copy of your database prior to making any database changes or modifying your data. The reason for the confirmation warning message is that you cannot click an Undo button to undo such changes as you can in other Microsoft Office applications. To undo a database action query, you would need to design and execute a compensating action query if you did not first make a copy of your database.
When you are in Design View for some query, you will see the buttons for changing the query type:

Figure 6.25 Types of Action Queries
Make Table Query
Make table queries are useful if you want to use existing data when you create a new table.
Consider the University database and suppose we need to create a table of ACS courses. We would start with a query that retrieves all ACS courses:
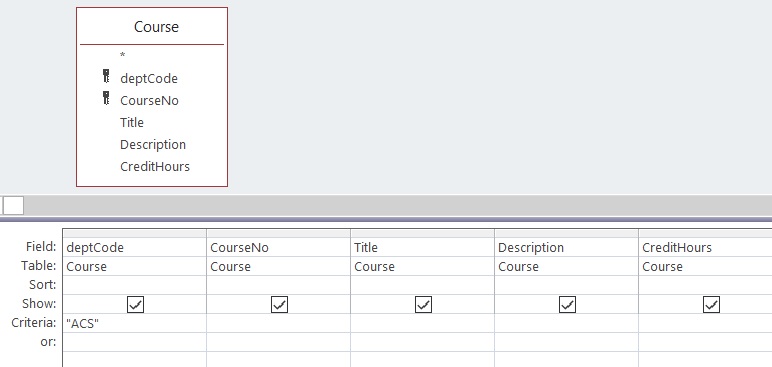
Figure 6.26 Begin by creating a select query
Next, we change the query to a Make-Table Query by clicking the Make Table button. When you do this Microsoft Access will prompt you for the name for your new table:
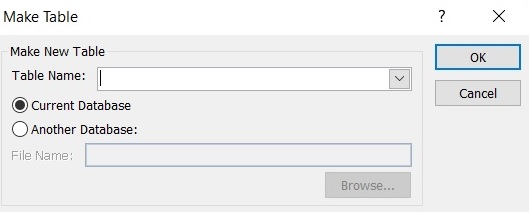
Figure 6.27 Prompt for table name for Make-Table query
The query does not run yet; you must either click the Run button or save the query and run it later. Each time you run the query, Microsoft Access will empty the table and insert rows into it.
Append Query
Suppose you wish to add rows to an existing table. To do that you must use an Append query. To create an Append query, begin by creating a Simple query that lists the information you wish to see inserted to the table. Once you know the query retrieves the proper information, click the Append button and Microsoft Access will prompt you for the table name that should receive the new rows. After this, you can run the query from the Run button, or you can save the query and run it later.
Delete Query
To remove entire rows from a table, you use a Delete query. As in the previous query types discussed, you can begin with a Simple query that retrieves the rows you wish to delete. Once the Simple query is working, you can change its type to Delete and run the query (or save it and run it later). Be careful with this delete query, a delete query can delete many rows in a single run.
Update Query
The type of query used to modify existing rows in a table is the Update query. In order to create such a query, you should begin with a Simple query that retrieves the rows that are to be updated and then change the type to Update. When you change the type to Update, Microsoft Access will add a new row to the Grid area where you specify the new values for each field to be updated. The new value can be the result from a calculation.
Example
Suppose we wish to update the Course table so the credit hours are doubled for each ACS course. Continue using the University database. We begin with a Simple query to retrieve the primary (PK) field, the fields to be updated, and the fields needed for selection criteria purposes. In this case, we will need a Simple query to retrieve the department code, course number, and credit hours fields:
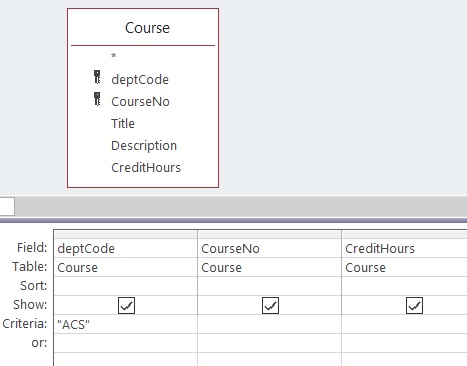
Figure 6.28 Simple select query with criteria
Next, we change the query type to Update and Microsoft Access modifies the Grid to include an Update To line. On that line, we enter an expression that generates the new values. To double the credit hours, we need the expression [creditHours]*2, as in:
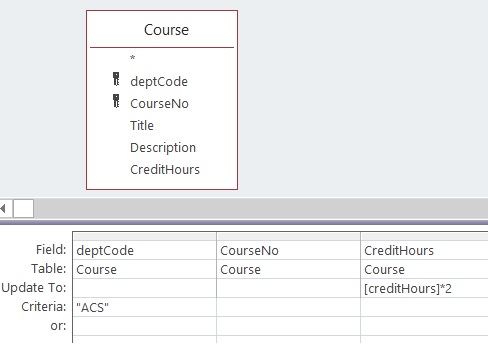
Figure 6.29 Update query with Update To line
6.7 Exercises
While using your MyUniversity database, create and save the following Access queries:
- Create a table of ACS courses, but name the new table ScienceCourses.
- Does the table ScienceCourses have a primary key? If not, create one.
- Run a delete query on ScienceCourses to delete all non 3-credit hour courses.
- Append all 3-credit hour MATH courses to ScienceCourses.
- Run an update query on ScienceCourses to double the credit hours of all 3-credit hour courses.
6.8 INNER And OUTER Joins
Whenever we use a query to retrieve data from two or more tables, the database query processor performs an operation called a join. In this section, we discuss inner joins, outer joins, and Cartesian products. We will also discuss some interesting special cases: self-join, anti-join, non-equi joins.
If we have previously established relationships between tables, and if we have more than one table in a query, then Microsoft Access will create joins based on those relationships. If necessary, we can alter, delete, or include new relationships.
Microsoft Access creates joins where rows join if the join fields are equal in value; such joins are called equi-joins. If we create a query for the University database and add the Department and Course tables to the relationships area of the query we have:
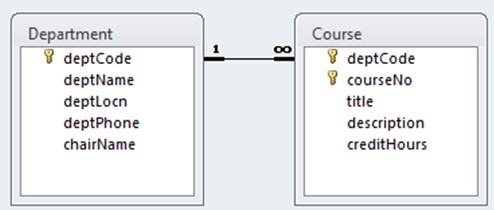
Figure 6.30 Standard equi-join
If you edit the relationship line (double-click it), you see the join properties:
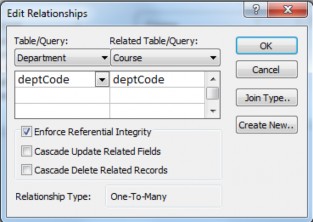
Figure 6.31 Join properties
Here, we can see the join is based on the common attribute deptCode. If you click on the Join Type button, you will get information on the type of join used. You will see (as the following diagram shows) that Access has selected the first of three options:
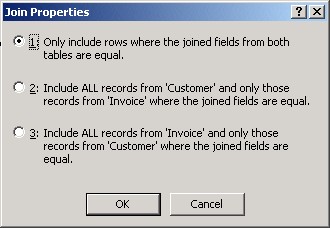
Figure 6.32 Choosing inner join or outer join
Joins can be further characterized as inner or outer joins. Option 1 is an inner join.
Options 2 and 3 are outer joins. One of these would also be called a Left Outer Join and the other a Right Outer Join. If you examine the SQL statement generated, you will see which is used. Left and Right choices are related to the textual expression of the SQL statement – which table name is leftmost/rightmost in the From clause.
6.8.1 INNER Join
All of the joins we have seen up to this point have been inner joins. For a row of one table to be included in the result of an inner join, the row must match a row in the other table. Because all joins so far have also been equi-joins, the matching is based on the values of the join fields of one table being equal to the values of the join fields of the other table. Consider the inner join between Department and Course based on deptCode:
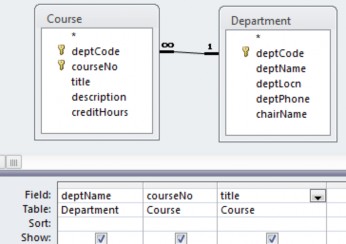
Figure 6.33 Inner join
If the tables have the contents shown below:
|
Course |
||||
|
Dept Code |
Course Number |
Title |
Description |
Credit Hours |
|
ACS |
1453 |
Introduction to Computers |
This course will introduce students to the basic concepts of computers: types of computers, hardware, software, and types of application systems. |
3 |
|
ACS |
1803 |
Introduction to Information Systems |
This course examines applications of information technology to businesses and other organizations. |
3 |
|
Department |
||||
|
Dept Code |
Dept Name |
Location |
Phone |
Chair |
|
ACS |
Applied Computer Science |
3D07 |
(204) 786-0300 |
Simon Lee |
|
ENG |
English |
3D05 |
(204) 786-9999 |
April Jones |
|
MATH |
Mathematics |
2R33 |
(204) 786-0033 |
Peter Smith |
Figure 6.34 Table contents
then the result of running the query is
|
Dept Name |
Course Number |
Title |
|
Applied Computer Science |
1453 |
Introduction to Computers |
|
Applied Computer Science |
1803 |
Introduction to Information Systems |
Figure 6.35 Query result
In the above result, notice there is no result line for English or Mathematics. This is because in the sample data there were no rows in Course that joined to the English or Mathematics rows in Department. Both rows in Course have a value of “ACS” in the deptCode field and so they joined to the ACS row in Department.
This query demonstrates a distinguishing characteristic of the inner join: only rows that match other rows are included in the results.
6.8.1 Exercises
- Consider the Library database to create a query that:
- Joins Loan and Member. List the member name and date due.
- Joins Loan and Book. List the book title and date due.
- Joins all three tables and lists the member name, book title, and date due.
- Consider the two tables A and B below.
Table A
|
X |
Y |
Z |
|
1 |
3 |
5 |
|
2 |
4 |
6 |
|
4 |
9 |
9 |
Table B
|
X |
Y |
Q |
|
1 |
3 |
5 |
|
1 |
4 |
6 |
|
2 |
4 |
7 |
|
3 |
4 |
5 |
- How many rows are in the result if A and B are joined based on the attribute X?
- How many rows are in the result if A and B are joined based on both attributes X and Y?
6.8.2 OUTER JOIN
Consider the Company database to support this outer join information. Suppose we wanted to produce a report that lists each department and its employees, and must include every department. The two tables would be joined based on equal values of the dept id field. We want all departments and we know that an inner join will not include a department if there are no employees for the department to join to. To get all departments included when we are joining two tables, we must use an outer join.
Consider the query that is started below:
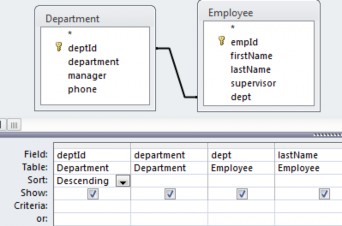
Figure 6.36 Initial query
By default the join is an inner join, but with Microsoft Access, you can get an outer join if you edit the relationship and specify either option 2 or option 3, as shown in the dialogue below:
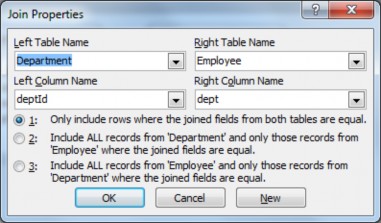
Figure 6.37 Default property is option 1
By choosing option 2, your query will include all departments whether or not the department can join to an employee. If there is no employee for a department to join to, then the row is joined to a row of nulls. When you do this, notice the change in the relationship line – it is now a directed line; this is how Microsoft Access illustrates outer joins:
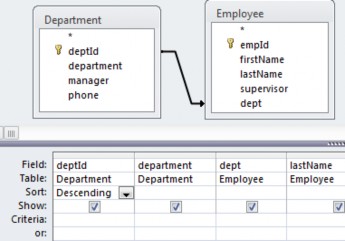
Figure 6.38 Outer join – all rows of Department
The first few rows of the result are:
|
deptId |
department |
dept |
lastName |
|
4 |
Special Operations |
||
|
3 |
Sales |
3 |
Long |
|
3 |
Sales |
3 |
Craft |
|
3 |
Sales |
3 |
Watkins |
Figure 6.39 Query result
Notice that the Special Operations department joined to a null row.
6.8.2 Exercises
- Consider the Company database and list each department and the number of employees in the department.
- Consider the Orders database.
- Create a query to list each customer and their orders (order id and order date). Are there any customers who have not placed an order?
- Modify the above query to list each customer and the number of orders they have placed (include all customers).
- Consider the library database.
- Create a query that will list every book and the date it was borrowed. Include all books in your result.
- Create a query to list every library member and the dates they borrowed books.Include all members
- Try creating a query that will list books that have never been borrowed.
- Try creating a query to list any members who have not borrowed a book.
6.8.3 Cartesian Product
Suppose you create a query, but without a join criteria. This is easily done by clicking on the relationship line and deleting it. When criteria for matching rows is not present, then each row of one table will join to each row of the other table.
This type of join is called a Cartesian Product and these can easily have very large result sets. If Department has 4 rows and Employee has 100 rows then the Cartesian Product has (4×100=) 400 rows. Databases used in practice have hundreds, thousands, even millions of rows; a Cartesian Product may take a long, long time to run.
Exercises
- Consider the Sales database and its Store and Product tables. Construct a query to list the storeID and the productID. When you add Store and Product to the relationships area there is a line joining the two tables. Delete the join line. Run the query. Notice how many rows there are; the number of rows in the result set is the number of stores times the number of products.
- Consider the Sales database and its Store, Product, and Sales tables. Suppose we want to obtain a list that shows for each store and product the total quantity sold. Note that the end user wants to see every store and product combination.
Hint: An approach you can use with Microsoft Access is to create two queries. The first of these performs a cross product of store and product (call this CP).
The second query is developed as a join between the query CP and the table Sales. CP is outer-joined to Sales in order that every combination of Store and Product is in the final result.
6.8.4 SELF-JOIN
A self-join, also called a recursive join, is a case where a table is joined to itself.
Consider the Company database and suppose we must obtain a list of employees who report to another employee named Raphael Delaney (i.e. List the employees Raphael Delaney supervises). To do this, we need to find the row in Employee for Raphael Delaney and then join that row to other rows of Employee where the supervisor field is equal to the empId field for Raphael. When we build the query in Microsoft Access, we simply add the Employee table to the relationships area twice. One copy of Employee will be named Employee_1. Consider the following query:
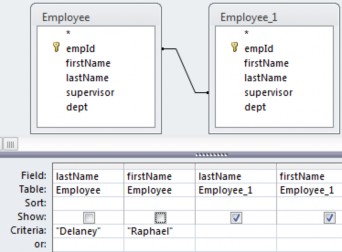
Figure 6.40 Self-Join
Note the following:
- The criteria specifies the row in Employee will be that of Raphael Delaney
- The join line connects supervisor to empId and so rows of Employee_1 will be employees who report to Raphael.
6.8.4 Exercises
- Consider the Genealogy database and develop queries to obtain:
- The father of Peter Chan.
- The mother of Peter Chan.
- The father and mother of Peter Chan.
- The children of Peter Chan.
- The grandchildren of Peter Chan.
- Consider the Orders database and the Employee table.
- Write a query to list the employee who does not report to anyone.
- Write a query to list each employee and the number of employees they supervise.
6.8.5 Anti-Join
Suppose we need to list persons in our Company database that are not supervising anyone. One way of looking at this problem is to say we need to find those people that do not join to someone else based on the supervises relationship. That is, we need to find those employees whose employee id does not appear in the supervisor field of any employee.
To do this with Microsoft Access, we can construct a query that uses an outer join to connect an employee to another employee based on employeeID equaling supervisor, but where the supervisor value is null. That is, we are looking for an employee who, in an outer join, does not join to another employee. See the query below:
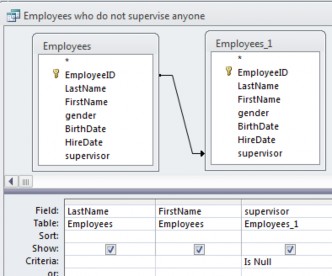
Figure 6.41 Anti-join query
This query involves a join, specifically an outer join, and because it retrieves those rows that do not join, it is sometimes referred to as a special case – an anti-join.
Exercises
- Consider the Genealogy database and develop a query to find people that do not have any sons.
- Consider the Genealogy database and develop a query to find people that do not have any daughters.
6.8.6 Non-Equi Join
A non-equi join is any join where the join criteria does not specify equals, “=”.
Suppose we wish to list all persons in the Genealogy database who are younger than, say, Peter Chan. One approach to getting the results is to join the row for Peter Chan to another row in Person where the birthdate of Peter Chan is greater than the birthdate of the other person. This type of join would be a “greater than” join as opposed to an equi-join. Proceed in the following way:
- Add Person to the relationships area twice so there is a Person table and a Person_1 table. If there are any relationship lines delete them.
- In the criteria line for Person fields: for firstName type “Peter” and for LastName type “Chan”.
- In the criteria line for birthDate in Person_1 type “> [Person].[birthDate]”
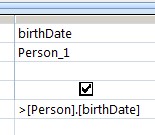
Figure 6.42 Non-equi join
In this way you are creating a “greater than” join.
- Include attributes from Person_1 to display these younger people.
- Run your query.
Exercises
- Consider the genealogy database.
a) Run the example from above.
b) Modify the example to list those people who are older than Peter Chan.
6.9 SQL SELECT Statement
SQL is the standard language for relational database systems. There are variations of SQL that appear in Object-oriented database systems, and elsewhere. The study of SQL (structured query language) is very important and the knowledge gained here is useful in other database environments.
We will examine one SQL statement, the Select statement, used to retrieve data from a relational database. Other common data manipulation statements are the Insert, Update, and Delete used to modify or add data. Select, Insert, Update, and Delete all belong to the Data Manipulation Language (DML) subset of SQL. Another group of statements belong to the Data Definition Language (DDL) subset of SQL. DDL statements are used to create tables, indexes, and other structures and are discussed in a later section.
The general SQL Select statement syntax:
Select list of attributes or calculated results (1)
From list of tables with/without join condition (2)
Where criteria rows must meet beyond the join specifications (3)
Group by list of attributes for creating groups (4)
Order by list of attributes for ordering the results (5)
Having criteria groups must meet (6)
Each clause of the SQL statement has its counterpart in the Design View used by Access:
(1) Attribute/calculated values are those for which Show is specified. If grouping is used, these must evaluate to a single value (group functions; grouping attribute) per group.
(2) Tables that appear in the From clause are shown in the Relationships Area.
(3) Specifications for the Where clause are found in the Criteria and Or rows.
(4) Specifications for the Group By clause are made in the Totals row.
(5) Specifications for sorting are made in the Sort row.
(6) A Having clause specifies criteria that a group must meet to be included in the result. This clause is generated when you use an aggregate function with a criteria.
When you design a query, you can switch between various views including SQL View. You can easily confirm through examples how the SQL statement is generated from Design View. For example, consider the following query and its SQL expression below. Note how Microsoft Access has used names with dot-notation to fully specify fields and how Access has placed one criteria rows must meet in a Having clause.
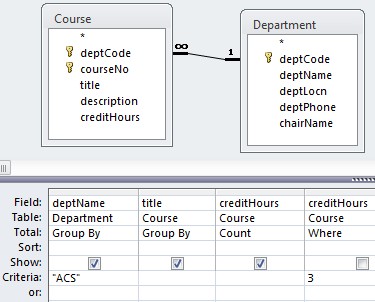
SELECT Department.deptName, Course.title, Count(Course.creditHours) AS CountOfcreditHours
FROM Department INNER JOIN Course ON Department.deptCode = Course.deptCode WHERE (((Course.creditHours)=3))
GROUP BY Department.deptName, Course.title HAVING (((Department.deptName)=”ACS”)) ;
Figure 6.43 QBE and SQL SELECT statements
Exercises
- Consider any of the queries from a previous section. Translate the query into SQL manually and then compare your result to what you see when you view the query in SQL View.
- Consider the following SQL statements and show how each statement would appear in Design View. You can confirm your result if you create a query, switch to SQL View, type the query statement and then switch to Design View. Unfortunately, if you make any syntax errors, Access will be unable to switch to Design View. Your database must contain the tables in the From clause.
Refer to the Orders.accdb database:
a) SELECT Products.ProductID, Products.ProductName, Categories.CategoryName
FROM Categories INNER JOIN Products ON Categories.CategoryID = Products.CategoryID
WHERE Categories.CategoryName = “Beverages” AND Products.Discontinued = Yes;
Refer to the AutosSales.accdb database:
b) SELECT Auto.Year, Dealer.Name, Auto.Colour, Auto.Price
FROM Dealer INNER JOIN Auto ON Dealer.DID = Auto.Did
WHERE Auto.Colour=”blue” AND Auto.Price>10000;
c) SELECT Auto.Year, Dealer.Name, Auto.Colour, Auto.Price
FROM Dealer RIGHT OUTER JOIN Auto ON Dealer.DID = Auto.Did
WHERE Auto.Colour=”blue” OR Auto.Price>10000;
6.10 SQL UNION AND UNION ALL
The Union and Union All operators merge the results of two or more queries that are given as SQL SELECT statements. With Microsoft Access, you must switch to SQL View to use Union/Union All
- UNION removes duplicates and sorts the results
- UNION ALL returns all values (includes duplicates) without sorting
- The output fields must be identical (number and type) for each SELECT. The syntax for UNION of two Select’s :
|
Union |
Union all |
|
|
SQL SELECT Statement1 |
SQL SELECT Statement1 |
|
|
UNION |
UNION ALL |
|
|
SQL SELECT Statement2 ; |
SQL SELECT Statement2 ; |
Figure 6.44 Union and Union ALL syntax
Any number of SELECT statements can be united with UNION. A requirement for using UNION is that the queries are union-compatible. These queries must retrieve the same number of fields, and fields in the same position across the multiple SELECT clauses must be of matching types.
Example
Consider the Employee table in the Company database. To list all names (first and last) in a single column, construct two queries: one to list the first names of employees and one to list the last names of employees.
These two queries can be combined to produce a single list of names. Now, in SQL view type and run:
Union Example
(sorted with no duplicates)
SELECT firstname FROM Employee
UNION
Select lastname from Employee ;
Exercises
- Modify the above example so that duplicates are eliminated.

